Showing posts with label blogspot. Show all posts

Free Music player for website, blogger

by in , 0

Ketnooi Music release Free new Music player for Webmasters.
You can embed K-Player to your blog, blogspot easily.
Demo see this blog
Features:
- Free music/Video for your vistors
- Easy to embed
- Light speed
- Integrate with any website, blog.
- Music is not breakable even if vistor go to new page


Just go to Video.Ketnooi.com, then create your own playlist, Save it, then get embed Code
 
Have fun!
Adding a Meta Description to Blogspot

by in 0

 An important part of a good SEO is the implementation of meta tags, which are commonly located in the header of our website, that are being, in the same time, invisible to users visiting the site. Well, to be more succinct, these tags have only one purpose: to include information about the page such as author name, date, key word, description, title, among others.

However, here we will only mention one, which is the meta description in Blogger. This description will appear as a fragment in the search results and as a description when sharing on Google+, Facebook and other social networks. A clear and precise description increases the chances of getting more clicks or visits.

As we will work only on the Blogger platform, here I will leave a little guide to easily add a meta description.

Read more »

Random Posts Widget to Blogspot

by in 0

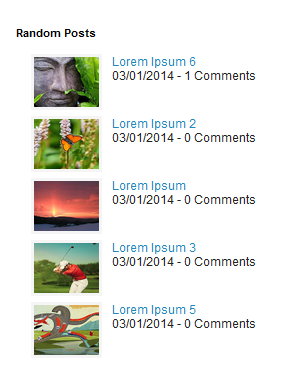
 The Random Posts widget or gadget for Blogger will show random posts you have added to your blog that due to the natural structure of blogs, could get lost deep in your archives, as most new users join and pick up from the moment they join, and they never bother going back to one of your good posts.

One of the easiest way to give a new life to your older posts is to display them in a random order in your sidebar. In this tutorial, I will share how you can add a random posts gadget in a Blogger blog.

The advantages of this widget is that is loading pretty fast and shows thumbnails of your posts and how many comments they have received, as well. So, let's begin adding it!


How to add Random Posts Widget to Blogger


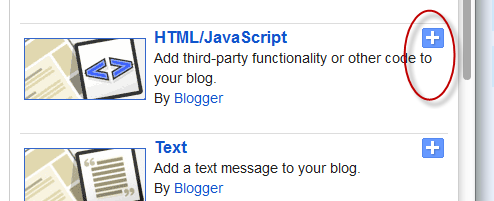
Step 1. From your Blogger Dashboard, Go to Layout, click on Add a Gadget 

random posts widget, random blogger

Step 2. Add a new HTML/JavaScript Gadget
random posts blogger

Step 3. Paste the following code in the empy HTML box:
<style>
#random-posts img{float:left;margin-right:10px;
width:65px;height:50px;background-color: #F5F5F5;padding: 3px;}
ul#random-posts {list-style-type: none;}
</style>

<ul id='random-posts'>
<script type='text/javaScript'>
var rdp_numposts=5;
var rdp_snippet_length=150;
var rdp_info='yes';
var rdp_comment='Comments';
var rdp_disable='Comments Disabled';
var rdp_current=[];var rdp_total_posts=0;var rdp_current=new Array(rdp_numposts);function totalposts(json){rdp_total_posts=json.feed.openSearch$totalResults.$t}document.write('<script type=\"text/javascript\" src=\"/feeds/posts/default?alt=json-in-script&max-results=0&callback=totalposts\"><\/script>');function getvalue(){for(var i=0;i<rdp_numposts;i++){var found=false;var rndValue=get_random();for(var j=0;j<rdp_current.length;j++){if(rdp_current[j]==rndValue){found=true;break}};if(found){i--}else{rdp_current[i]=rndValue}}};function get_random(){var ranNum=1+Math.round(Math.random()*(rdp_total_posts-1));return ranNum};
</script>
<script type='text/javaScript'>
function random_posts(json){for(var i=0;i<rdp_numposts;i++){var entry=json.feed.entry[i];var rdp_posttitle=entry.title.$t;if('content'in entry){var rdp_get_snippet=entry.content.$t}else{if('summary'in entry){var rdp_get_snippet=entry.summary.$t}else{var rdp_get_snippet="";}};rdp_get_snippet=rdp_get_snippet.replace(/<[^>]*>/g,"");if(rdp_get_snippet.length<rdp_snippet_length){var rdp_snippet=rdp_get_snippet}else{rdp_get_snippet=rdp_get_snippet.substring(0,rdp_snippet_length);var space=rdp_get_snippet.lastIndexOf(" ");rdp_snippet=rdp_get_snippet.substring(0,space)+"&#133;";};for(var j=0;j<entry.link.length;j++){if('thr$total'in entry){var rdp_commentsNum=entry.thr$total.$t+' '+rdp_comment}else{rdp_commentsNum=rdp_disable};if(entry.link[j].rel=='alternate'){var rdp_posturl=entry.link[j].href;var rdp_postdate=entry.published.$t;if('media$thumbnail'in entry){var rdp_thumb=entry.media$thumbnail.url}else{rdp_thumb="https://blogger.googleusercontent.com/img/b/R29vZ2xl/AVvXsEjBnpR5lDZhyphenhyphend91xdjFBXV_OacMyHD8fWf6XlwMtNxWmvjLr6vJ1uT4XUA6XB7k3C3FMXm92Z98v4UnnebSCaJ7uSnFLIau_oSrAfejeTTw-A1dKXt42sLv7MRG-o2-PPodGzNY_OzxMo8/s1600/no_thumb.png"}}};document.write('<li>');document.write('<img alt="'+rdp_posttitle+'" src="'+rdp_thumb+'"/>');document.write('<div><a href="'+rdp_posturl+'" rel="nofollow" title="'+rdp_snippet+'">'+rdp_posttitle+'</a></div>');if(rdp_info=='yes'){document.write('<span>'+rdp_postdate.substring(8,10)+'/'+rdp_postdate.substring(5,7)+'/'+rdp_postdate.substring(0,4)+' - '+rdp_commentsNum)+'</span>'}document.write('<div style="clear:both"></div></li>')}};getvalue();for(var i=0;i<rdp_numposts;i++){document.write('<script type=\"text/javascript\" src=\"/feeds/posts/default?alt=json-in-script&start-index='+rdp_current[i]+'&max-results=1&callback=random_posts\"><\/script>')};
</script>
</ul>
Replace 5 with the number of posts you want to be show.
For bigger thumbnails, change the pixels in red from width:65px;height:50px

Step 4. Press Save and you're done! Enjoy!

Cách tạo sitemap cho blogspot

by in 0

1. Đăng nhập vào Google Webmaster Tools với tài khoản Google của bạn.
2. Tại tab bên trái bảng điều khiển => Tối ưu hóa => Sơ đồ trang web (Xem hình dưới) để cài site map.
3.Bấm nút Thêm/Kiểm tra sơ đồ trang web góc trái
create site map blogspot
4.Một của sổ Popup xuất hiện bạn dán đoạn code lấy theo RSS của Google vào:
atom.xml?redirect=false&start-index=1&max-results=500
Sau đó bấm chọn gửi sơ đồ trang web
create site map blogspot
Như thế là xong gửi sitemap blogspot cho google rồi


Tóm lại địa chỉ sitemap của bạn sẽ là http://youruser.blogspot.com/atom.xml?redirect=false&start-index=1&max-results=500