Random Posts Widget to Blogspot

by in 0

 The Random Posts widget or gadget for Blogger will show random posts you have added to your blog that due to the natural structure of blogs, could get lost deep in your archives, as most new users join and pick up from the moment they join, and they never bother going back to one of your good posts.

One of the easiest way to give a new life to your older posts is to display them in a random order in your sidebar. In this tutorial, I will share how you can add a random posts gadget in a Blogger blog.
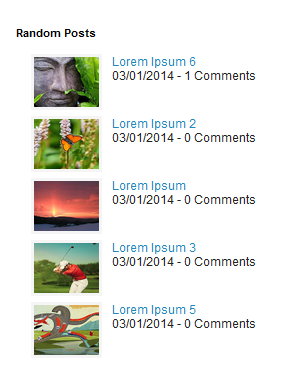
The advantages of this widget is that is loading pretty fast and shows thumbnails of your posts and how many comments they have received, as well. So, let's begin adding it!


How to add Random Posts Widget to Blogger


Step 1. From your Blogger Dashboard, Go to Layout, click on Add a Gadget 

random posts widget, random blogger

Step 2. Add a new HTML/JavaScript Gadget
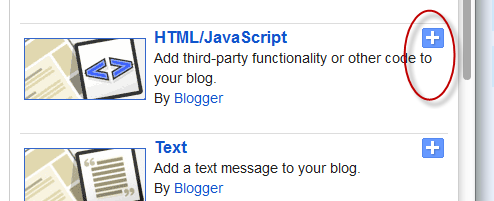
random posts blogger

Step 3. Paste the following code in the empy HTML box:
<style>
#random-posts img{float:left;margin-right:10px;
width:65px;height:50px;background-color: #F5F5F5;padding: 3px;}
ul#random-posts {list-style-type: none;}
</style>

<ul id='random-posts'>
<script type='text/javaScript'>
var rdp_numposts=5;
var rdp_snippet_length=150;
var rdp_info='yes';
var rdp_comment='Comments';
var rdp_disable='Comments Disabled';
var rdp_current=[];var rdp_total_posts=0;var rdp_current=new Array(rdp_numposts);function totalposts(json){rdp_total_posts=json.feed.openSearch$totalResults.$t}document.write('<script type=\"text/javascript\" src=\"/feeds/posts/default?alt=json-in-script&max-results=0&callback=totalposts\"><\/script>');function getvalue(){for(var i=0;i<rdp_numposts;i++){var found=false;var rndValue=get_random();for(var j=0;j<rdp_current.length;j++){if(rdp_current[j]==rndValue){found=true;break}};if(found){i--}else{rdp_current[i]=rndValue}}};function get_random(){var ranNum=1+Math.round(Math.random()*(rdp_total_posts-1));return ranNum};
</script>
<script type='text/javaScript'>
function random_posts(json){for(var i=0;i<rdp_numposts;i++){var entry=json.feed.entry[i];var rdp_posttitle=entry.title.$t;if('content'in entry){var rdp_get_snippet=entry.content.$t}else{if('summary'in entry){var rdp_get_snippet=entry.summary.$t}else{var rdp_get_snippet="";}};rdp_get_snippet=rdp_get_snippet.replace(/<[^>]*>/g,"");if(rdp_get_snippet.length<rdp_snippet_length){var rdp_snippet=rdp_get_snippet}else{rdp_get_snippet=rdp_get_snippet.substring(0,rdp_snippet_length);var space=rdp_get_snippet.lastIndexOf(" ");rdp_snippet=rdp_get_snippet.substring(0,space)+"&#133;";};for(var j=0;j<entry.link.length;j++){if('thr$total'in entry){var rdp_commentsNum=entry.thr$total.$t+' '+rdp_comment}else{rdp_commentsNum=rdp_disable};if(entry.link[j].rel=='alternate'){var rdp_posturl=entry.link[j].href;var rdp_postdate=entry.published.$t;if('media$thumbnail'in entry){var rdp_thumb=entry.media$thumbnail.url}else{rdp_thumb="https://blogger.googleusercontent.com/img/b/R29vZ2xl/AVvXsEjBnpR5lDZhyphenhyphend91xdjFBXV_OacMyHD8fWf6XlwMtNxWmvjLr6vJ1uT4XUA6XB7k3C3FMXm92Z98v4UnnebSCaJ7uSnFLIau_oSrAfejeTTw-A1dKXt42sLv7MRG-o2-PPodGzNY_OzxMo8/s1600/no_thumb.png"}}};document.write('<li>');document.write('<img alt="'+rdp_posttitle+'" src="'+rdp_thumb+'"/>');document.write('<div><a href="'+rdp_posturl+'" rel="nofollow" title="'+rdp_snippet+'">'+rdp_posttitle+'</a></div>');if(rdp_info=='yes'){document.write('<span>'+rdp_postdate.substring(8,10)+'/'+rdp_postdate.substring(5,7)+'/'+rdp_postdate.substring(0,4)+' - '+rdp_commentsNum)+'</span>'}document.write('<div style="clear:both"></div></li>')}};getvalue();for(var i=0;i<rdp_numposts;i++){document.write('<script type=\"text/javascript\" src=\"/feeds/posts/default?alt=json-in-script&start-index='+rdp_current[i]+'&max-results=1&callback=random_posts\"><\/script>')};
</script>
</ul>
Replace 5 with the number of posts you want to be show.
For bigger thumbnails, change the pixels in red from width:65px;height:50px

Step 4. Press Save and you're done! Enjoy!

Download image with PHP CURL

by in 0

If you have allow_url_fopen set to true:

$url = 'http://example.com/image.php';
$img = '/my/folder/flower.gif';
file_put_contents($img, file_get_contents($url));


Else use cURL:


$ch = curl_init('http://example.com/image.php');
$fp = fopen('/my/folder/flower.gif', 'wb');
curl_setopt($ch, CURLOPT_FILE, $fp);
curl_setopt($ch, CURLOPT_HEADER, 0);
curl_exec($ch);
curl_close($ch);fclose($fp);


Source: Saving image from PHP URL using PHP


difference between jQuery .val() and .attr('value')?

by in 0

.val() works on all input type elements in a useful way, including <select>...even in the cases of <select multiple>, checkboxes, and radio buttons (in which .val() gets or sets an array of selected values not just a string).
So basically they serve different purposes, even though .attr('value') behaves the same in some situations, like textboxes. The preferred method is .val() to get consistent behavior everywhere.
Just for kicks, here's a lesser-known example for checkboxes that makes .val() handy:
<input name="mytest" type="checkbox" value="1">
<input name="mytest" type="checkbox" value="2">
<input name="mytest" type="checkbox" value="3">
<input name="mytest" type="checkbox" value="4">
You can do this:
$("input[name='mytest']").val([1, 2, 3]);
....which will check the first 3 boxes.


wordpress Year Shortcode

by in , 0

For the functions.php file:

function year_shortcode() {
  $year = date('Y');
  return $year;
}
add_shortcode('year', 'year_shortcode');

Usage

Use [year] in your posts.

wordpress Using Custom Fields

by in , 0

Dump out all custom fields as a list

<?php the_meta(); ?>

Display value of one specific custom field

<?php echo get_post_meta($post->ID, 'mood', true); ?>

"mood" would be ID value of custom field

Display multiple values of same custom field ID

<?php $songs = get_post_meta($post->ID, 'songs', false); ?>
<h3>This post inspired by:</h3>
<ul>
	<?php foreach($songs as $song) {
		echo '<li>'.$song.'</li>';
	} ?>
</ul>

Display custom field only if exists (logic)

<?php 
    $url = get_post_meta($post->ID, 'snippet-reference-URL', true); 

	if ($url) {
	    echo "<p><a href='$url'>Reference URL</a></p>";
	}
?>

Reference URL

wordpress Turn on WordPress Error Reporting

by in , 0

Comment out the top line there, and add the rest to your wp-config.php file to get more detailed error reporting from your WordPress site. Definitely don't do this live, do it for local development and testing.

// define('WP_DEBUG', false);

define('WP_DEBUG', true);
define('WP_DEBUG_LOG', true);
define('WP_DEBUG_DISPLAY', false);
@ini_set('display_errors', 0);

wordpress Turn On More Buttons in the WordPress Visual Editor

by in , 0

These buttons (like one for adding an <hr> tag) aren't there by default in the WordPress visual editor, but you can turn them on pretty easily. This is code for your active theme's functions.php file, or make a functionality plugin.

function add_more_buttons($buttons) {
 $buttons[] = 'hr';
 $buttons[] = 'del';
 $buttons[] = 'sub';
 $buttons[] = 'sup';
 $buttons[] = 'fontselect';
 $buttons[] = 'fontsizeselect';
 $buttons[] = 'cleanup';
 $buttons[] = 'styleselect';
 return $buttons;
}
add_filter("mce_buttons_3", "add_more_buttons");

Reference URL